Water management is one of the top concerns for landlords and developers in Kenya’s fast-growing rental markets. Whether you’re constructing single rooms in Joska, bedsitters in Ruiru, or two-bedroom flats in Syokimau, a centralized water tank system is a smart solution to ensure tenants have access to reliable water without daily refills or disputes.
In this guide, we cover how to plan, size, build, and secure a central tank system tailored to rental compounds in Kenya.
Why Install a Central Tank System?
Centralized storage eliminates the inefficiencies of individual tanks per unit. When designed correctly, it:
- Maintains consistent water pressure
- Makes it easier to monitor and regulate consumption
- Lowers costs by minimizing excess piping and fittings
- Supports automation tools like float switches or timers
- Consolidates storage for better maintenance and refilling
This model also prevents common tenant complaints like unequal flow, tank theft, or billing confusion.
Step 1: Estimate Water Needs and Select Tank Sizes
Start by calculating your total daily demand and storage requirement for backup.
Estimated Daily Water Usage:
| Unit Type | Daily Use Per Unit |
|---|---|
| Single Room | 100–150 litres |
| Bedsitter | 150–200 litres |
| 1–2 BR Apartment | 250–400 litres |
Example:
For 12 bedsitters at 180L/day each = 2,160L/day
With 4-day reserve: 8,640 litres total storage
To meet this, you can pair a 5,000-litre Kentank with a 3,000-litre tank. See Top Water Tank Brands in Kenya for quality tank options.
Step 2: Decide Between Elevated or Ground-Level Storage
You have two main layout choices:
Option 1: Ground Tank + Booster Pump
- Easier to refill using bowser or low-pressure mains
- Enables automated refill
- Ideal for compounds with power access
Option 2: Roof/Platform Tanks (Gravity-Fed)
- No electricity needed for delivery
- Suitable for low-maintenance systems
- Requires a solid DIY tank stand or rooftop slab
If possible, combine both options store in a ground tank and pump to an elevated tank for gravity distribution. Learn more in Pump vs Gravity.
Step 3: Plan an Efficient Plumbing Layout
Design a distribution network that minimizes pressure loss and simplifies repairs.
Key tips:
- Use a central manifold system with PVC pipes branching to each unit
- Maintain equal pipe lengths for balanced pressure
- Install individual isolation valves (ball valves) for each house
- Choose durable PN10+ rated PVC piping
A well-planned layout reduces leaks, improves flow, and lowers installation cost.
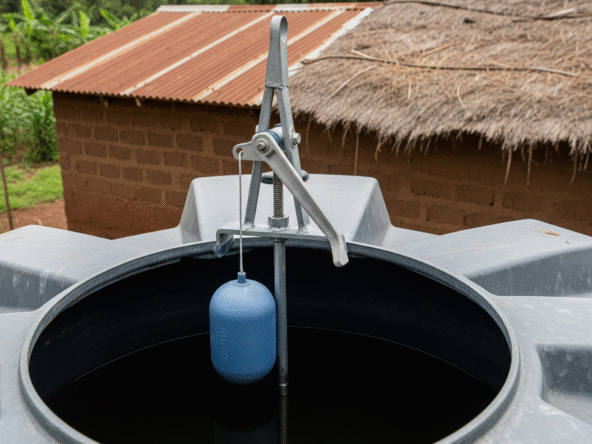
Step 4: Add Automation and Monitoring
Automation helps you stay on top of water levels, refills, and usage.
Recommended tools:
- Float switches to auto-start booster pumps
- Digital timers to restrict pumping to off-peak hours
- Tank overflow alarms to prevent wastage—see Alarm Systems for Overflow
These tools are especially helpful if you manage the property remotely or have multiple plots.
Step 5: Secure the Installation
To prevent theft, tampering, or misuse:
- Use lockable tank enclosures
- Protect pumps with metallic boxes and locks
- Install anti-siphon valves or tamper-proof ball valves
Many landlords also mark tanks with paint or branding to discourage theft or swapping during refills.
Step 6: Add Optional Efficiency Features
For long-term sustainability, consider:
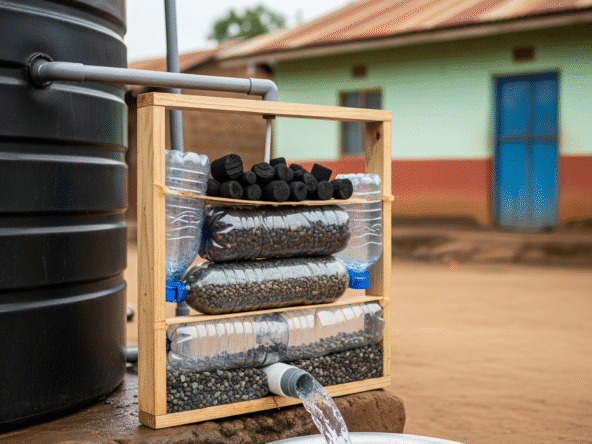
- Rainwater harvesting integration using gutters and filters (Rainwater Harvesting in Kenya)
- First-flush diverters for clean roof runoff (Diverter Designs)
- Gravel soak-away beds for managing overflow safely (DIY Gravel Drainage)
Adding these ensures less strain on the main supply and better drainage around tanks.
A centralized tank system is one of the best investments for Kenyan landlords, especially in areas with unreliable municipal supply. With proper sizing, secure mounting, and thoughtful plumbing, you’ll ensure smooth operations and happy tenants whether you manage 5 rooms or 50.
Explore More Practical Housing Guides: